Over time, castor wheels experience wear and tear, reducing mobility, uneven rolling, and potential damage to floors. Whether it’s office chairs, industrial trolleys, or heavy-duty machinery, knowing how to replace castor wheels can help restore smooth movement and extend the lifespan of your equipment.
In this step-by-step guide, we’ll walk you through the process of replacing worn-out castor wheels, ensuring a hassle-free and efficient castor wheel replacement for any application.
Signs That Your Castor Wheels Need Replacing
Before carrying out a castor wheel replacement, it’s important to identify when wheels no longer perform efficiently.
Common Signs of Worn-Out Castors:
- Difficulty Rolling – If your equipment requires more force to move, the wheels may be worn or misaligned.
- Flat Spots or Cracks – Visible damage such as cracks, uneven wear, or missing pieces indicates that a replacement is necessary.
- Squeaking or Grinding Noises – Unusual sounds can signify worn bearings or debris build-up.
- Unstable or Wobbly Movement – If your castors don’t roll smoothly or the equipment shakes while moving, it’s time for a new set.
Ignoring these signs can lead to inefficient movement, increased strain on users, and even damage to the flooring.
Tools and Materials Needed for Castor Wheel Replacement
Before starting the replacement process, gather the necessary tools to ensure a smooth and efficient installation.
What You’ll Need:
✔ New Castor Wheels – Ensure they match your equipment's correct size, material, and load capacity.
✔ Wrench or Spanner -To loosen and tighten the mounting bolts.
✔ Screwdriver - Required for castors with screw fittings.
✔ Lubricant (Optional) – Helps ensure smooth operation of new wheels.
✔ Cleaning Cloth – Remove dust and debris before installing the new castors.
Once you have everything ready, you can proceed with the castor wheel replacement
process.
Step-by-Step Guide to Replacing Castor Wheels
Step 1: Remove the Old Castor Wheels
- If your castors are bolt-mounted, use a wrench or spanner to loosen and remove the bolts.
- For push-in stem castors, pull the wheel firmly while twisting to release it from the socket.
- If the castors are plate-mounted, unscrew them from the base using a screwdriver.
Tip:
If the wheels are stuck due to rust or dirt, apply a small amount of lubricant to loosen them.
Step 2: Clean the Mounting Area
- Wipe down the area where the new castors will be attached to remove dirt, grease, or debris.
- Inspect the mounting holes for any damage. If necessary, tighten loose fittings or replace worn components before installing the new wheels.
Tip:
A clean mounting surface ensures a secure fit and smooth performance.
Step 3: Install the New Castor Wheels
- For Bolt-Mounted Castors: Align the new castor with the mounting hole and tighten the bolts securely using a wrench.
- For Stem Castors: Push the stem into the socket until it clicks into place.
- For Plate-Mounted Castors: Use a screwdriver to fasten the plate onto the base, ensuring all screws are firmly secured.
Tip:
Ensure all castors are aligned properly to prevent uneven movement.
Step 4: Test the New Wheels
- Carefully roll the equipment back and forth to ensure the new castors move smoothly.
- If the wheels feel stiff or noisy, apply a small amount of lubricant to the bearings.
- Ensure all wheels rotate evenly and the equipment remains stationary.
Tip:
If your castors have brakes, test the locking mechanism to ensure they engage correctly.
Choosing the Right Replacement Castor Wheels
Selecting the right wheels is crucial for durability and performance when carrying out a castor wheel replacement. Consider the following factors:
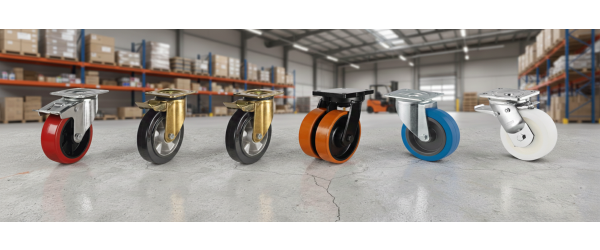
a. Wheel Material
- Rubber Castors - Ideal for smooth, quiet rolling on hard floors.
- Nylon Castors - Hard-wearing and best for carpeted surfaces.
- Polyurethane Castors - A balance of durability and floor protection.
- Metal Castor - Heavy-duty but may require floor protection.
b. Load Capacity
Ensure the new wheels can support the equipment's weight. Exceeding the load rating can cause premature wear and instability.
c. Mounting Type
Check whether your castors require plate-mounted, stem-mounted, or bolt-fixed attachments to match the existing fitting.
5. Maintenance Tips for Prolonging the Life of Castor Wheels
To maximise the lifespan of your castor wheels, follow these maintenance tips:
✔ Regular Cleaning – Remove dust, dirt, and debris that can cause friction.
✔ Lubricate Bearings – Apply lubricant periodically for smooth rolling.
✔ Inspect for Wear and Tear – Check for cracks, flat spots, or wobbly movement.
✔ Tighten Fixings – Ensure bolts and screws remain secure over time.
Routine maintenance helps extend the durability of your castors and prevents the need for frequent replacements.
Conclusion
A proper castor wheel replacement improves mobility, enhances safety, and prolongs the life of your equipment. By following this step-by-step guide, you can easily replace worn-out castors and ensure smooth performance across various applications.
For high-quality castor wheel replacement options, visit Castors Online
and explore our wide range of durable castors suited for all types of furniture, trolleys, and industrial equipment.